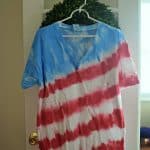
American Flag Tie Dye Shirt
Learn how to make this American Flag Tie Dye Shirt easily with these simple steps. This pattern is perfect for the 4th of July.
Materials
- white cotton t-shirt
- rubber bands
- dye red and blue
- bottles
- rubber gloves
- drop cloth
Instructions
- The first step in tie-dying is figuring out what pattern you want to create. For this American flag pattern, I folded the shirt in a diagonal pattern.
- Once folded you can rubber band the shirt so that the dye won't bleed.
- The first part will be wider to create the blue portion of the flag and then the others will be spread apart evenly. See pictures on-site if needed!
- Once you have your shirt rubber banded you are ready to start the process of tie-dying.
- I actually used a spray bottle style so it wasn't as messy for me. If you are using a bottle of dye I would suggest putting your shirt on a rack so the dye won't puddle and bleed through to the other parts of the shirt.
- Allow your shirt to dry fully. Most likely overnight would be best.
- Then you can cut off the rubber bands and heat set in the dryer for 20 minutes.
- Once heat-set you can wash as normal.
Notes
I would wash it by itself for the first couple of times just to be on the safe side.