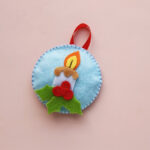
Felt Christmas Candle Ornament
Learn how to make a felt Christmas candle ornament to hang on your tree this holiday season.
Materials
- Felt fabric
- Thread
- Scarp Felt or Polyfill
- Ribbon
Instructions
- Select different colored felt fabrics including green, red, orange, and yellow-colored felts. Trace the large flame on yellow, the small flame on orange, the leaf patterns on the green, the berry shapes on the red. The rest of the patterns can be done on the colored felt of your choice. We choose light blue but you can pick any color that goes with your tree theme. Cut out 2 pieces for the base.
- Place the small flame cutout on top of the large flame cutout and then stitch them together with the base cutout, near the top side. If you are confused about how this should be sewn be sure to take a look at the picture for reference.
- Place the melting wax cutout on the top side of the candle cutout. Place the candle on the base, right below the flame pattern, and stitch the top side of the melting wax along with the candle to the base.
- Place the leaf cutouts on the bottom side of the base, right below the candle pattern. Stitch the leaf patterns near their top ends. See the photo to reference how to place the leaves.
- Place the berry cutouts at the top of the leaves and stitch each berry separately with a cross-stitch.
- Place the other base cutout under the patterned one and stitch around the side to join them together. Keep a small opening to stuff the ornament base. You can stuff the ornament base with polyfill if you have it on hand but we just used the scrap felt pieces.
- Once you are done stuffing the base, stitch the opening to secure the stuffing. Attach a ribbon loop on the backside of the ornament.