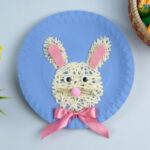
Paper Plate Easter Bunny Yarn Craft
Let's make a fun and simple paper plate Easter bunny just in time for the holiday season. This easy kids' craft is created with simple items like a paper plate, yarn, and wiggly eyes.
Materials
- paper plate
- acrylic paint
- white yarn
- pink felt
- wiggly eyes
- hemp twine
- silk ribbon
- pink pompom
- printable template
Instructions
- The first step is to paint the paper plate, we chose blue but you could use whatever color you like best.
- Print and cut out the bunny head template.
- Once the template has been cut out you are going to place it on the plate and draw around it. This part might be a little tricky for younger crafters so moms or dads this would be a good step to help with.
- Now that the bunny head is in place on the paper plate you will want to use a needle to poke holes every ¼ inch along with the drawing. This is another good spot for parents to do as sharp needles can poke little fingers.
- Tie a knot at the end of your yarn, big enough that it doesn't go through the other side. You can also put a piece of tape over the not to make sure it doesn't pull through. Sew the bunny head with the white yarn going back and forth across different holes. This is where I suggest using a plastic needle for little crafters, with no sharp points.
- When you get to the end of the yarn and the bunny is completely covered tie off the yarn in the back of the paper plate.
- The next step is gluing on the bunny's face. Using the glue stick, glue on the wiggly eyes.
- Cut 3 pieces of twine, approximately 3 inches, to make the bunny whiskers, and then glue a single pink pompom on for the nose.
- Draw 2 bunny inner ears on pink felt, cut out, and glue on ears.
- The last step is to tie a bow with pink ribbon (or the color of your choosing) and glue it to the neck.