
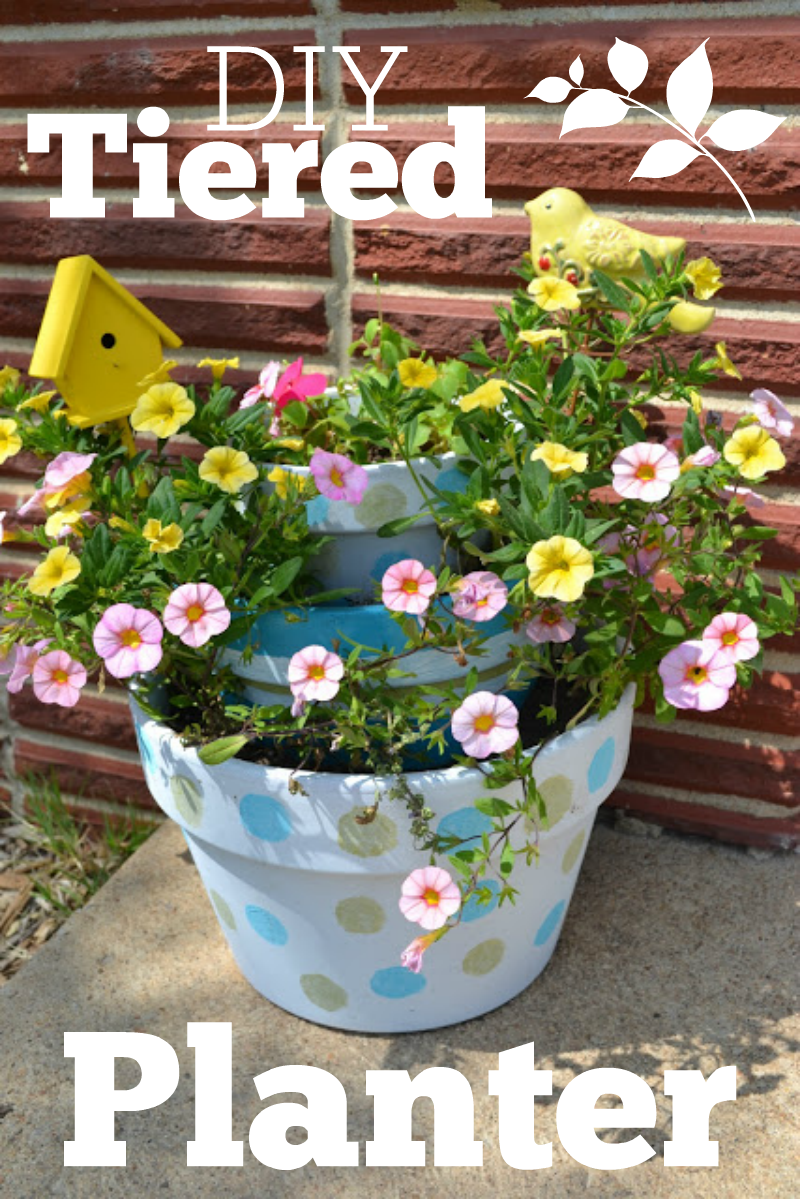
We painted the bottom and top pots white with blue/green polka dots and the middle blue/white stripes with a small green stripe between the white one (which you really can't see in this picture). Being the bird lover that I am I had to add in some cute birdie picks. The bird one came from Hobby Lobby. Its been a minute since I picked him up so they may or may not have him anymore. He was $2 on sale. The little bird house I just recently picked up at Target in the $1 spot, yes that cute little thing was only a buck. 🙂
I think they turned out cute, not perfect, but cute nonetheless. I'm thinking I want to maybe do a smaller 2 tiered one as well. I love flowers! Everything is potted around here though because I spent tons trying to get something to grow last Spring/Summer in this Kansas soil and it wasn't happening. Poo!
If you want to make your own tiered planter all it took was some clay pots from Lowe's.
I bought this shape which isn't the traditional shape of clay pots but I just liked these more. You don't even have to go with clay pots, just 3 different size pots of the same shape works too. I went with clay because I knew I was going to paint them and wanted something on the cheaper side. I think I paid around $10 for all 3 pots so not to bad.
I completely spaced on taking pictures of the during process or planting process. Oops!

This made a great DIY project to do with my daughter. I think it would be even greater to have them just go crazy and paint their own designs on one. I have my daughter's hand print on one from a couple of years ago. I don't keep it outside though as I'm afraid it will wear off. I actually don't even have anything planted in it. Ha! It just sits in my china cabinet.
Some extra tips:
Because this project had been sitting around ready to be finished, while my plants had been also sitting around ready to be planted we skipped the primer and poly and just went straight for paint. I figure by next Spring they will need to be repainted so I would definitely suggest prime and polyurethaning these pots if you want to prevent having to possibly redo them every year.
Also while planting I started at the bottom planted around the edge and tiered up from there. This prevented any dirt from falling onto my bottom plants. However, you could plant from top down. I just found it easier to plant without the pots already in place.


~ Tami says
This is so cute. I would love to invite you to join our Friday Block Party at Curb Alert! The party is open all weekend.
http://tamicurbalert.blogspot.com/2012/05/friday-block-party-5-feature-from-party.html
Hope to see you there!
Tami @ Curb Alert!
Accidentally Wonderful says
This looks so whimsical and lovely! What a great way to show off a lot of flowers in a limited space! Found your blog through "Someday Crafts"
Melissa says
Thanks for stopping by. 🙂
xoxo,
Melissa
Cindy says
Great Idea!
xoxo,
http://icycrystalgalleria.blogspot.ca/
Cindy
Cindy says
Great idea!
Melissa says
Thanks 🙂
xoxo,
Melissa
A Proverbs 31 Wife says
What a great idea! I found you via Tuesday linkups and am following you by email now. Come see me sometime at http://aproverbs31wife.com
Melissa says
Thanks for stopping by and following! 🙂 I will definitely stop by your blog as well.
xoxo,
Melissa
DianaLuv says
Hey I found you on bloglovetherapy, I know this is a great blog because I can scrolling and reading all your blogs 🙂 Cant wait to catch up.
New follower
Love DianaLuv,
http://dianaluv.blogspot.com
Melissa says
Aww thanks so much DianaLuv. It means a lot to know that people are enjoying my blog. 🙂 Thanks for following as well.
xoxo,
Melissa
lexi says
i'll show this to my friend who loves to garden. it's a great idea! btw, I'm having a 100+ Follower Urban Decay Giveaway! I hope you enter 🙂 ♥
Melissa says
I will definitely enter. 🙂
xoxo,
Melissa