
This post contains affiliate links.
Has there ever been a high end piece that you have just loved but couldn't stomach the price on? I have loved this mirror but my wallet was just not having it. So like I have done in times past, I decided to create my own diy multipanel mirror.
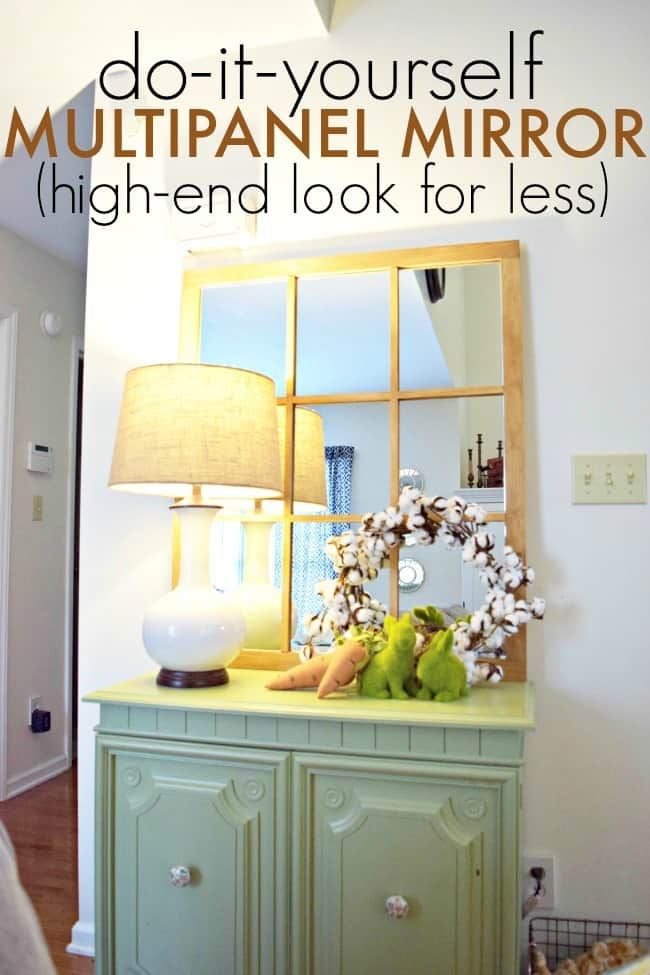
DIY MULTIPANEL MIRROR
What you will need:
½ sheet of ¼ inch plywood (cheaper to buy a whole sheet)
(2) 1 x 2 x 8 pine boards
(2) ¾ x ¾ x 8 trim board
36 x 48 frame-less mirror (or 12 x 12 mirror tiles)
[easyazon_link identifier="B007ZIYVDC" locale="US" tag="thgisli03-20"]Loctite mirror adhesive[/easyazon_link]
Wood glue
[easyazon_link identifier="B007TSYNG8" locale="US" tag="thgisli03-20"]E6000[/easyazon_link] (optional)
Tools needed:
[easyazon_link identifier="B00S4OQ9A4" locale="US" tag="thgisli03-20"]miter saw[/easyazon_link]
table or [easyazon_link identifier="B007QUZ16A" locale="US" tag="thgisli03-20"]circular saw[/easyazon_link]
[easyazon_link identifier="B000FA0BMC" locale="US" tag="thgisli03-20"]clamps[/easyazon_link]
Directions:
First things first... I want to mention that the easiest way to do this would be to use mirror tiles. You can check out how Ana White created one with mirror tiles here. However, we had a specific spot in mind and 3 (12 x 12) mirror tiles across would have been to long. So the next best thing was to make a custom mirror using a frame-less 36 x 48 mirror.
(well..... we probably could have had custom tile sizes cut buuuutttt.... I didn't realize they actually did that... knowing now I might have looked into doing that.. Just a heads up if you would rather go that route to.)
on to what we actually did do....
- First you will want to pick out a mirror that will fit your space. You can go with the 36 x 48 inch or your local home improvement store will probably carry I variety of frame-less mirror sizes.
- Once you have the mirror picked out you will want to cut your plywood down to size. We cut ours down to 39 x 51 inches. This is 1 and ½ inches on each side of the mirror for the pine board framing. If you have a bigger or smaller mirror just add an additional 3 inches per mirror size for your plywood cut.
- Now that you have your plywood cut you can cut your pine board framing down to size. We cut the bottom and top pieces to 39 inches and the sides to 48 inches. We then lined the framing up with the edges and glued them with wood glue. You could also attach these with brad nails if you chose to.
- Once the framing was fully dried we used [easyazon_link identifier="B007ZIYVDC" locale="US" tag="thgisli03-20"]loctite mirror adhesive[/easyazon_link] and attached the mirror to the plywood. Allow to dry according to package. We gave it extra time... a few days.
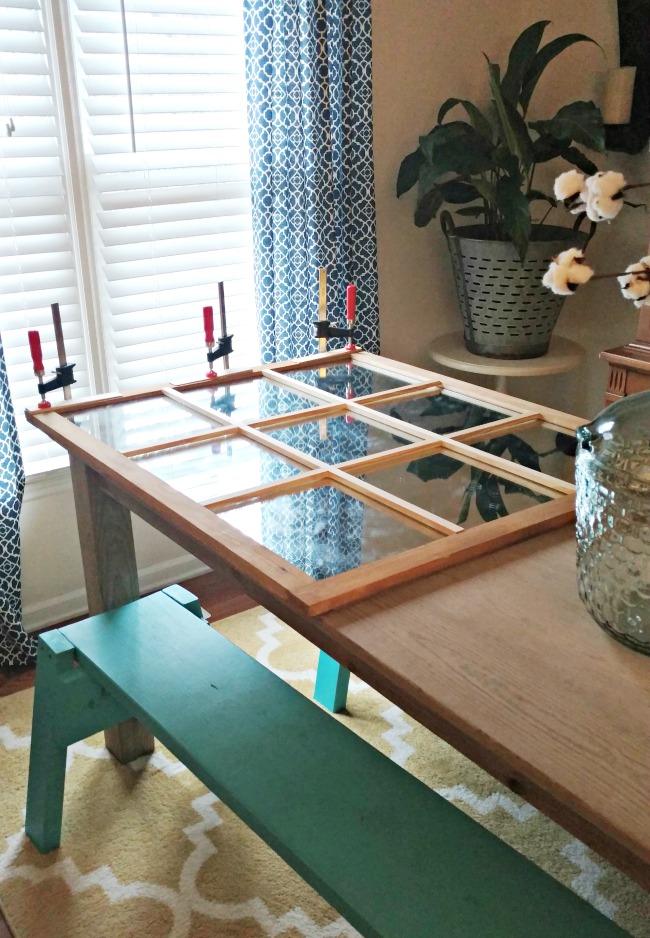
- Now the final step was attaching the inside framing to the mirror. First we measured and cut the pieces to fit. I don't have exact measurements to this because they need to be measured to your mirror. Why? because it is important to have the pieces fit snug. We had the vertical pieces full length and cut the sides pieces to fit.
- Once you have all your inside pieces cut you can use some clamps and glue to set up the faux panels. Allow to dry.
- Now the final step is attaching the inside panel to the mirror. This will create the faux panel look. We were going to originally go with brad nails along the edging to attach. However, we were a little nervous about hitting and shattering the mirror. So... instead we decided to use [easyazon_link identifier="B00178MO58" locale="US" tag="thgisli03-20"]E6000 industrial glue[/easyazon_link] to attach the panel. It worked like a charm. You can decide which way works best for you but I suggest going the gluing route.
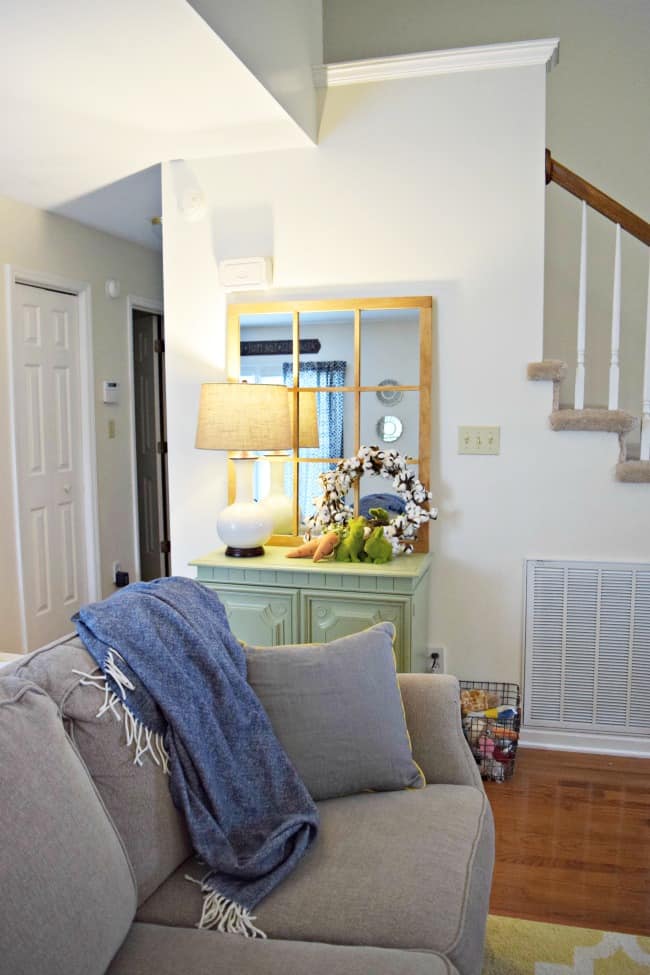
I wished I could share more pictures of the steps we took. Sadly, I apparently misplaced them. I searched through every sd card I own and still no pictures. Oops! If I happen to run across them at some point I will update this post. But, I feel like the process was fairly straight forward and easy to understand. If you have any questions you are more than welcome to email me and I will try to answer them to my best ability. Here is another shot of the finished diy multipanel mirror.
Let me know if you create this diy multipanel mirror and you also might like a few of these other fun easy diy projects.
DIY Farmhouse Table

Sarah | Boo Roo and Tigger Too says
Such a beautiful mirror, and it looks pretty straight forward to make too.
Melissa Coleman says
Thanks Sarah 🙂
I definitely think the tiles would have been the easier way to go but this was pretty easy too.