
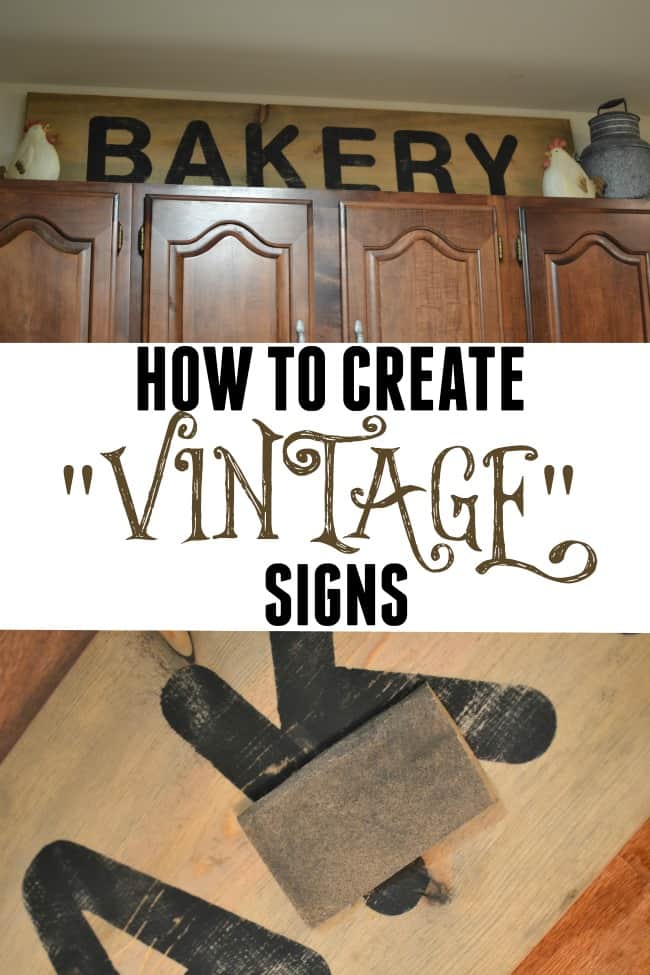
This one is my new "vintage" kitchen sign. If you have ever wanted to learn how to create vintage signs that are made to look old and weathered then keep reading.
It's super easy!
This post contains affiliate links.
Supplies you will need:
- Wood
- Homemade Stain
- Alphabet Stencils
- Craft Paint
- Stipple Foam Brush
- Sandpaper
How to create vintage signs made to look old.
1. The first step in how to make wood look primitive and old is to pick out your piece of wood and stencils.
The size really just depends on how big you want your sign. For this specific bakery sign that I created, I used a 1 x 12 x 6 board. You won't need the whole 6-foot piece but again the size you will need depends on what word you want to create.
I laid all of my stencils out to spell bakery, measured an extra 5 inches on each side, and then made my final cut.
2. Once I got the piece measured and cut, I started in on staining it.
I have been using this homemade stain that I created and I absolutely love the way it comes out. It is the perfect grayish brown, old barn wood look. I also like that I don't have to worry so much about creating a mess whether on the garage floor or my clothes with this stain.
However, if you are not interested in making your own stain then a great option for this grayish brown color is weathered oak by Minwax.
If you choose the homemade stain option, you will want to let it set and oxidize after staining. That is what allows it to turn this gorgeous weathered and vintage color.
Like regular stains, you can put more than one coat on if you want it to turn out a little darker. See below for how to create the stain mix.
3. Now that you have your piece stained and dried you are ready to move on to the next step.
I bought 7-inch alphabet stencils at my local craft store but if you had a silhouette you could also make a vinyl stencil for this project.
I laid out my letters to spell bakery and then taped them down so they wouldn't slide on me while stipple brushing on the paint.
4. Stipple on the letters using craft paint. I used black but you could use any paint color that matches your home decor.
I definitely recommend stipple brushing when using stencils. I feel like you get crisper edges compared to brushing it on. You could also trace the stencils and hand paint the letters as well.
As you may notice in my stencils, there are little spots that connect the stencils in letters like the E and K. I connected these for a full letter look just by hand touching up the rest.
5. Allow your paint to dry and once it is fully dry you are ready to do the final step.
Using a sander or sandpaper rough up the letters and edges until you have the perfect vintage look you are going for. If you want it to look really old then continue to sand until the letters are barely visible.

This project only cost me about $20 between the wood and the stencils and I already had the other materials. I think that is a pretty good deal considering the cost of purchasing some handmade signs off Etsy or at your local markets.
If you are looking to create the homemade wood stain then keep reading for the simple mixture.
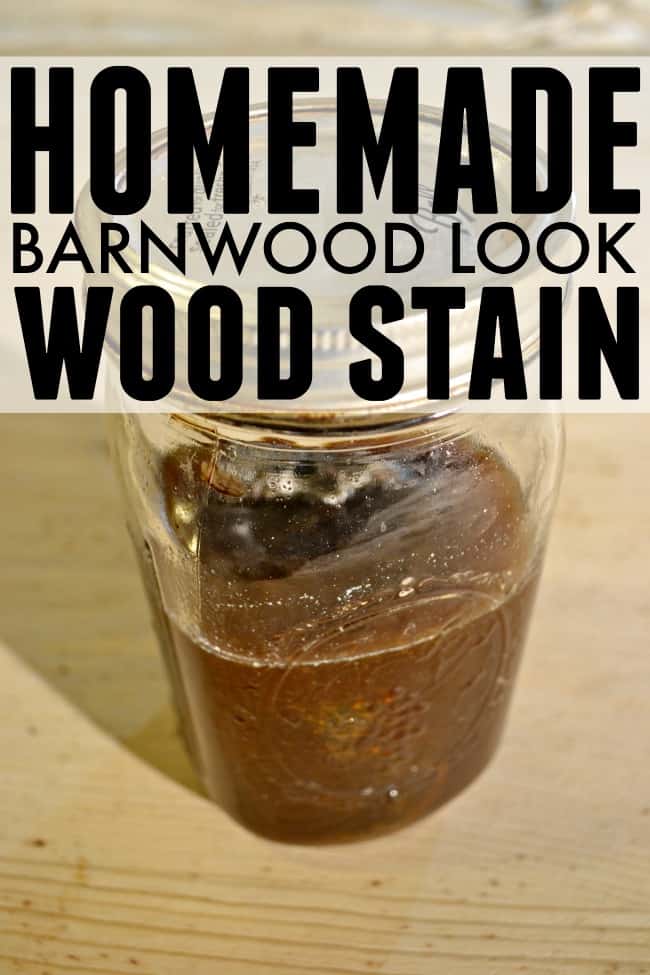
Homemade Wood Stain Recipe
Stain materials you will need:
How to use this stain!
Mix the ingredients together. I didn't do any exact measuring. I filled up my mason jar with apple cider vinegar, put in the piece of steel wool, and then poured in about ½ cup of coffee.
Give it a good shake and allow to sit for at least 24 hours, even longer works better.
Here is how it looks after stained on the wood and allowed to oxidize.
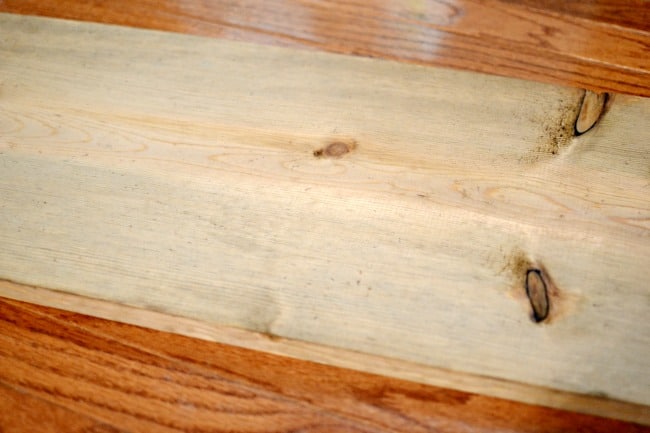
This was after just one coat and I just love the gray tone it gets. The longer it sits and dries the darker it becomes as well. As you can see in the first picture the final product was even darker.
That is it, that is how to create vintage signs and turn new pieces of wood into "old" pieces of wood.
I hope you liked this easy and inexpensive do-it-yourself home decor project.
If you have been wanting a wooden sign in your home give it a try. There are so many possibilities of what you could create. I think a family name and established sign would be fantastic. I just might have to create one of those for myself.
Even more fantastic home decor wood projects you don't want to miss!!
- How to make Wood Signs
- DIY Mod Podge and Wooden Letters
- Decorative Wooden Ladder
- DIY Rustic Wooden Lantern
- Wooden Bead Garlands
- DIY Wooden Arrows
- Vintage Signs made from Foam Board
Want to print the instructions for this How to Create Vintage Signs Post?

Charity Payne says
I love this! Thank-you SO much for sharing!
Tres morris says
Can these b sealed so that can be displayed outdoors or in the weather? And I'd so, what would I use to seal them safely over top of acrylic craft paint? (Making vintage looked for sale signs)
Melissa says
Tres,
If I was going to display outdoors I would replace the craft paint for exterior paint and cover with waterproofing sealer.
Kaye says
@Tres morris, Yes, I make signs and hang them outside all the time with nothing more than a clear coat or waxed protective layer, depending on how I want it to weather or not weather. I had a bunch of my wooden Christmas signs submerged in flood water, thanks to Hurricane Harvey, and absolutely loved the patina it created. I can’t think of a better way to make your sign look authentic, than to allowing natural elements to have its way with it.
Debra says
Great post and excellent instructions. Can you tell me what type of wood board you used for this sign?
Melissa says
Debra,
Just your standard 1 x 12 x 6 board cut down to size.
Kim says
Hi Melissa,
I'm just getting started to make my signs, and I know this may sound juvenile, but the stencils I bought are altogether on one sheet, do u cut these to make even squares out of them and draw a straight line lightly on the wood to make reservations words u want? I just didn't know if it would b easier to cut them out or leave them on the one sheet. Thanks for helping this first-timer out!!!
Melissa Coleman says
Kim,
I do not cut them. My stencils came as individual letters. If you can cut them I would think it would make it easier. Although I don't know how your stencil sheet is set up and cutting them may be harder than it is worth. I am assuming you are using smaller letters since they are all on one sheet. If I was doing that I would probably just individually trace the letters on and then hand paint them. I hope this advice is helpful.
Melissa
Karen says
Did you use prepared coffee or 1/2 cup coffee grounds?
Melissa Coleman says
Karen, I used prepared coffee. 🙂
Lynn says
When you used your stencil, how did you fill in where there are gaps? For example, on the "E" there are gaps where the horizontal parts of the letter do not join the vertical part of the "E." But when your sign is complete, the gap isn't there. I have searched all over for stencils that have a font that doesn't have those gaps, but I can't find them. How do you address this when you're making your sign?
BTW, absolutely love the sign! That's why I've spent so much time looking for a stencil that will match up with your letters, lol! I want one just like yours.
Melissa Coleman says
Lynn,
The spot is so little that I felt comfortable enough to hand touch up that spot. Sorry I didn't address that in the post. I will remember to go back in and update that. 🙂
cindy downing says
What does the steel wool do. Do you use it to apply the stain too?
Melissa Coleman says
Cindy, the steel wool breaks down and mixes with the vinegar. If you have some left you can use it to rub on the wood but make sure you wear some gloves. The longer it sits though the more the wool will break down so if you don't have any left you can just brush on like normal.
Barbara says
Can you put th e steel wool in some cheesecloth to catch the steel wool parts when it breaks down.
Melissa says
Barbara,
I suppose you could, although I don't think it is really necessary. What doesn't dissolve falls to the bottom of the jar and once it gets really low I just make a new batch. I can't guarantee the cheesecloth wouldn't stop it from fully breaking down and creating that desired color.
Meegan says
What a great tutorial! Thanks for all the details and tips.
Melissa Coleman says
Thanks Meegan 🙂