
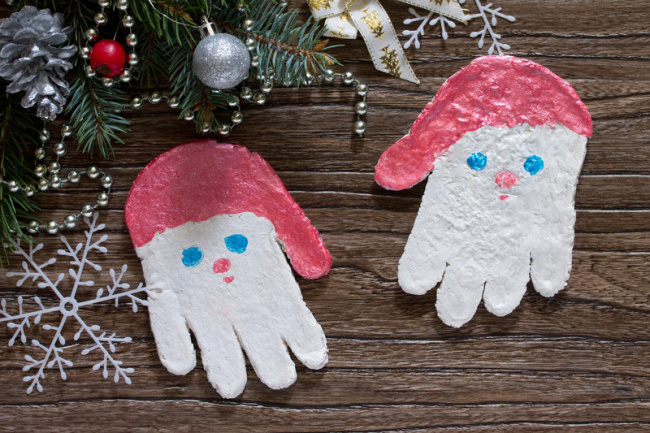
This salt dough ornament recipe is so easy to make and allows you to create this handprint Santa salt dough ornament that is perfect for gift-giving.

We love to create different salt dough ornaments to paint and hang on the tree.
They make great gifts, especially for grandparents who love things their grandkids make for them.
A fun way to make lasting memories is using our easy salt dough recipe to make an adorable Santa salt dough ornament to treasure forever!
I especially love this handprint version that I can look at each year to remember just how small they once were.
Ingredients you will need salt dough Santa handprint ornament
- 1 cup Salt
- 4 Cups All Purpose Flour
- 1 ½ Cups Water (warm)
- Rolling pin (optional)
- Cookie Cutters (optional)
- Various Paint Colors for Painting
How to make a handprint Santa salt dough ornament!
- Combine your salt and water in a bowl. Add your flour. If 4 cups don't seem to be enough you can add more if needed.
- Knead until dough forms.
- Use a rolling pin (or a glass/soup can work just as well) to roll out your dough until it’s approximately ¼″ thick.
- Make your hand impression just as you would a normal handprint keeping your fingers closed.
- Cut around the print. You can cut around the shape of the "beard" or you can do as I did and just cut a circle around the handprint. I found that easier.
- Poke a hole in the top with a straw. Don’t forget to do this part otherwise, you won’t be able to hang your ornament.
- Bake at 250 for 2 hours.
- Once you have finished baking your ornaments and allowed them to completely cool you can finish them off by painting them however you please.
For the Santa, we painted around the outside with a green. We then painted his hat and beard area white, added some peach for his face, and used black to add to his details.
You can follow exactly how we did in the above photo or create them however you see Santa.

You can create all sorts of salt dough ornament shapes by using various cookie cutters.
You can also add extra layers (see the heart ornament above) by using water to stick the layers together.
This would be cute if you wanted to make Santa's mustache 3D.
How many years do salt dough ornaments last?
If you preserve your ornaments properly, they can last for years. This post has been updated over the years but this actual Santa salt dough ornament is going on 8 years old and still looks just as good as it did on day 1. I recommend coating them with an acrylic sealer once finished drying.
What paint do you use for salt dough ornaments?
Acrylic Paint... Acrylic is archival and the ornaments will look beautiful when you take them out year after year.

Even more Christmas ornaments


Leave a Reply